위 글은 코틀린 리액티브 프로그래밍책을 보며 내용을 정리한 내용입니다.
책 : 코틀린 리액티브 프로그래밍
리부 차크라보티 지음
조승진 옮김
지금까지 푸시 기반의 리액티브 프로그래밍 아키텍처를 살펴보았다.
옵저버블은 추가 처리를 위해 옵저버가 소비할 항목을 배출한다는 사실을 배웠다.
그러나 옵저버블이 옵저버가 소비할 처리량보다 더 빨리 아이템이 배출되는 상황에는 어떻게 해결해야할까?
백프레셔 이해
옵저버블의 유일한 문제 상황은 옵저버가 옵저버블의 속도에 대처할 수 없는 경우다.
옵저버블은 기본적으로 아이템을 동기적으로 옵저버에서 하나씩 푸시해 동작한다.
그러나 옵저버가 시간을 필요로 하는 작업을 처리해야 한다면 그 시간이 옵저버블이 각 항목을 배출하는 간격보다 길어질 수도 있다.
다음 예제를 보자
fun main(args: Array<String>) {
    val observable = Observable.just(1,2,3,4,5,6,7,8,9)
    val subject = BehaviorSubject.create<Int>()
    subject.observeOn(Schedulers.computation())
        .subscribe({
            println("Subs 1 Received $it")
            runBlocking { delay(200) }
        })
    subject.observeOn(Schedulers.computation())
        .subscribe({
            println("Subs 2 Received $it")
        })
    observable.subscribe(subject)
    runBlocking { delay(2000) }

}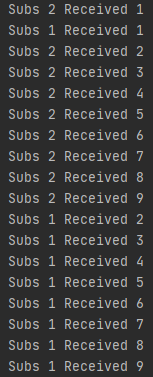
옵저버가 속도를 못맞추는것처럼 만들기위해 delay 함수를 이용하였다.
원래 배운대로라면 핫 옵저버블은 구독한것들을 push할때 구독한 목록들을 순차적으로 배출해야하지만 delay때문에 sub2만 한번에 방출되었다.
이것은 첫 번째 옵저버에서 각 계산이 오래 걸렸기 때문에 각 배출은 대기열로 들어가게 된 것이다.
계산이 오래걸리고 계속 값이 쌓이다보면 결국 OutOfMemoryError같은 예외를 포함해 많은 문제를 일으킬 수 있다.
중간에 observeOn은 다른 쓰레드를 사용했다는 의미다.
다음 예제는 subject를 사용하지않고 observable과 observe를 사용한 콜드 옵저버블이다.
fun main(args: Array<String>) {
    val observable = Observable.just(1, 2, 3, 4, 5, 6, 7, 8, 9)
    observable
        .map { MyItem(it) }
        .observeOn(Schedulers.computation())
        .subscribe({
            println("Received $it")
            runBlocking { delay(200) }
        })
    runBlocking { delay(2000) }
}

data class MyItem(val id: Int) {
    init {
        println("MyItem Created $id")
    }
}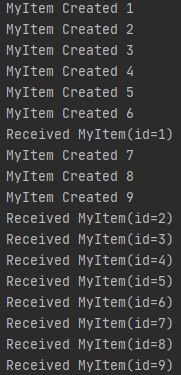
하나씩 객체를 만들고 전달되고 하는 과정이 진행되어야하지만 다운스트림(Received MyItem)에서 delay가 발생하기때문에 순차적으로 발생할수없고 계속 객체는 만들어지고 값을 받는과정은 지연된다.
이 문제의 해결책은 컨슈머와 생산자간에 피드백을 주고 받을 수 있는 채널일 것 이다.
이를 통해 컨슈머는 생산자에게 이전 배출의 처리가 완료될 때까지 기다려야 한다고 전달할 수 있다.
이렇게하면 컨슈머 또는 메시지를 처리하는 미들웨어가 부하가 높은상태에서 포화 상태가 되거나 응답하지 않는 것을 막아줄 수 있다.
대신 메시지양을 줄이도록 요구할 수 있고 생산자는 생성 속도를 줄이도록 결정할 수 있다.
이 피드백 채널을 백프레셔라고 한다.
옵저버와 옵저버블은 백프레셔를 지원하지 않으므로 그 대신 플로어블과 구독자를 사용할 수 있다.
플로어블
플로어블(Flowables)는 옵저버블의 백프레셔 버전이라고 부를 수 있다.
플로어블은 연산자를 위해 최대 128개의 항목을 가질 수 있는 버퍼를 제공한다.
그래서 컨슈머가 시간이 걸리는 작업을 실행할 때 배출된 항목이 버퍼에서 대기할 수 있다.
다음은 옵저버블에대한 예제이다.
fun main(args: Array<String>) {
    Observable.range(1, 1000)
        .map { MyItem3(it) }
        .observeOn(Schedulers.computation())
        .subscribe({
            print("Received $it;\t")
            runBlocking { delay(50) }
        }, { it.printStackTrace() })
    runBlocking { delay(6000) }
}

data class MyItem3(val id: Int) {
    init {
        print("MyItem Created $id;\t")
    }
}
이 예제를 실행시켜보면 처음만 Received MyItem3(1)이 호출되고 1000개의 객체가 만들어진 후 값을 방출하게 된다.
이런 현상은 OutOfMemory 오류를 비롯해 많은 문제를 발생시킬 수 있다.
다음은 Flowable예제이다.
fun main(args : Array<String>){
    Flowable.range(1,1000)
        .map { MyItem4(it) }
        .observeOn(Schedulers.io())
        .subscribe({
            println("Received $it")
            runBlocking { delay(50) }
        },{it.printStackTrace()})
    runBlocking { delay(60000) }
}
data class MyItem4(val id:Int){
    init {
        println("MyItem Created $id")
    }
}
플로어블은 모든 아이템을 한 번에 배출하지 않고 컨슈머가 처리를 시작할 수 있을 때까지 기다렸다가 다시 배출을 전달하며, 완료될 때까지 이 동작을 반복한다.
플로어블과 옵저버블 사용 구분
지금쯤 플로어블을 사용하기 편리한 도구라고 생각하고 모든 옵저버블을 대체할 수도 있다.
그러나 항상 플로어블이 옵저버블보다 나은 것은 아니다. 플로어블은 백프레셔 전략을 제공하지만 옵저버블이 존재하는 데는 이유가 다 있으며 둘 다 장단점이 있다.
플로어블은 언제 사용할까
다음은 플로어블의 사용을 고려해야 할 상황이다. 플로어블은 옵저버블보다 느리다는것을 기억하자.
- 플로어블과 백프레셔는 더 많은 양의 데이터를 처리할 때 도움이 된다. 따라서 원천에서 10,000개 이상의 아이템을 배출한다면 플로어블을 사용하자.
- 파일이나 데이터베이스를 읽거나 파싱하는 경우이다.
- 결과를 반환하는 동안 IO 소스의 양을 조절할 수 있는 블로킹을 지원하는 네트워크 IO 작업/스트리밍 API에서 배출할때 사용된다.
옵저버블은 언제 사용할까
- 소량의 데이터(10,000개 미만의 배출)을 다룰 때
- 오로지 동기 방식으로 작업하길 원하거나 또는 제한된 동시성을 가진 작업을 수행할 때
- UI 이벤트를 발생시킬 때
다시한번 플로어블은 옵저버블보다 느리다는 것을 명심하자.
플로어블과 구독자
플로어블은 옵저버 대신 백프레셔 호환이 가능한 구독자를 사용한다. 람다식을 사용한다면 차이점을 발견할 수 없을 것이다.
그렇다면 옵저버 대신 구독자를 사용해야하는 이유는 무엇일까?
구독자가 일부 추가 기능과 백프레셔를 동시에 지원하기 때문이다.
예를들어 얼마나 많은 아이템을 받기 원하는지 메시지로 전달할 수 있다.
아니면 구독자를 사용하는 동안은 업스트림에서 수신하고자 하는 항목의 수를 지정하도록 할 수 있는데 아무 값도 지정하지 않으면 어떤 배출도 수신하지 못할 것이다.
람다를 사용한 구독자는 옵저버와 유사하다.
이 구현은 자동으로 업스트림으로부터 제한 없는 배출을 요구한다.
fun main(args :Array<String>){
    Flowable.range(1,15)
        .map { MyItem6(it) }
        .observeOn(Schedulers.io())
        .subscribe(object : Subscriber<MyItem6>{
            lateinit var subscription : Subscription
            override fun onSubscribe(subscription: Subscription) {
                this.subscription = subscription
                subscription.request(5)
            }

            override fun onNext(t: MyItem6?) {
                runBlocking { delay(50) }
                println("Subscriber received " + t!!)
                if(t.id == 5){
                    println("Requesting two more")
                    subscription.request(2)
                }
            }

            override fun onError(t: Throwable) {
                t.printStackTrace()
            }

            override fun onComplete() {
                println("Done!")
            }

        })
    runBlocking { delay(10000) }
}
data class MyItem6(val id : Int){
    init {
        println("MyItem Created $id")
    }
}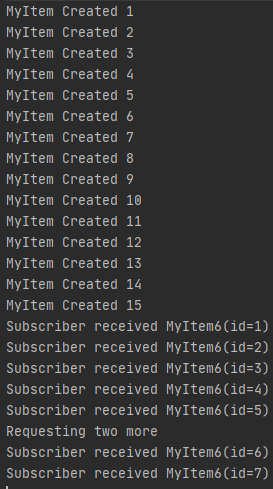
Flowable은 모든 값을 전달하지만 subscriber가 5개만 request 하기때문에 5개만 배출되고 또 마지막에 2개만 더 request하기때문에 2개 더 배출한다.
그리고 그 이후의 모든 배출을 무시한다.
fun main(args: Array<String>) {
    Flowable.range(1, 15)
        .map { MyItem6(it) }
        .observeOn(Schedulers.io())
        .subscribe(object : Subscriber<MyItem6> {
            lateinit var subscription: Subscription
            override fun onSubscribe(s: Subscription) {
                this.subscription = s
                subscription.request(5)
            }

            override fun onNext(t: MyItem6?) {
                runBlocking { delay(50) }
                println("Subscriber received " + t!!)
                if (t?.id == 5) {
                    println("Requesting two more")
                    subscription.request(2)
                }
            }

            override fun onError(t: Throwable?) {
                t?.printStackTrace()
            }

            override fun onComplete() {
                println("Done!")
            }
        })
    runBlocking { delay(10000) }
}
처음부터 플로어블 생성하기
전에 Observable.create처럼 observable을 생성하고 직접적으로 연산자를 호출하듯이 플로어블도 그럴 수 있을까?
예제를 살펴보자
fun main(args: Array<String>) {
    val subscriber: Subscriber<Int> = object : Subscriber<Int> {
        override fun onComplete() {
            println("All Completed")
        }

        override fun onNext(t: Int) {
            println("Next $t")
        }

        override fun onError(t: Throwable?) {
            println("Error Occured ${t?.printStackTrace()}")
        }

        override fun onSubscribe(s: Subscription?) {
            println("New Subscription ")
            s?.request(10)
        }
    }
    val flowable: Flowable<Int> = Flowable.create<Int>({
        for (i in 1..10) {
            it.onNext(i)
        }
        it.onComplete()
    }, BackpressureStrategy.BUFFER)

    flowable.observeOn(Schedulers.io())
        .subscribe(subscriber)

    runBlocking { delay(10000) }
}

Observable.create처럼 Flowable을 만들고 flowableEmitter를 정의하였다.
onComplete뒤에있는 Stratege는 버퍼에 대한 전략이다.
다운스트림이 따라잡을 수 없는 배출이 생길경우 캐싱/버퍼링 또는 삭제 등 다양한 백프레셔 전략을 설정하도록 도와준다.
전략들을 알아보자.
- BackpressureStratege.MISSING : 이 전략은 백프레셔 구현을 사용하지 않으며 다운스트림이 스스로 오버 플로우를 처리해야 한다. 이 옵션은 onBackpressureXXX() 연산자를 사용할 때 유용하다.
- BackpressureStratege.ERROR : 이 전략은 어떤 백프레셔로도 구현하지 않는데 다운스트림이 소스를 따라잡을 수 없는 경우, MISSINGBackpressureException예외를 발생시킨다.
- BackpressureStratege.BUFFER : 이 전략은 다운스트림이 배출을 소비할 수 있게 될 때까지 제한이 없는 버퍼에 저장한다. 버퍼의 크기를 넘어서는 경우 OutOfMemoryError가 발생할 수 있다.
- BackpressureStratege.DROP : 이 전략은 다운스트림이 바쁘고 소비 속도를 계속 유지할 수 없을 때 모든 배출량을 무시한다. 다운스트림이 이전 작업을 끝내고 나서 처음 배출된 것을 처리하고 그 사이의 값들은 모두 생략된다.
- BackpressureStratege.LATEST : 이 전략은 다운스트림이 바쁘고 배출을 유지할 수 없는 경우 최신 배출량만을 유지하고 나머지는 모두 무시한다. 다운스트림이 이전 작업을 마치면 작업이 끝나기 전에 마지막으로 배출된 것을 수신한다.
플로어블을 생성하면서 이런 백프레셔 전략 중 일부를 연산자로 구현해보자.
옵저버블로 플로어블 만들기
Observable.toFlowable() 연산자는 백프레셔를 지원하지 않는 원천에서 BackpressureStrategy를 구현하는 방법을 제공한다.
이 연산자는 Observable을 Flowable로 바꿔준다.
다음 예제에서는 몇가지 다른 전략을 시도한다.
fun main(args: Array<String>) {
    val source = Observable.range(1, 1000)
    source.toFlowable(BackpressureStrategy.BUFFER)
        .map { MyItem7(it) }
        .observeOn(Schedulers.io())
        .subscribe {
            print("Rec. $it;\t")
            runBlocking { delay(1000) }
        }
    runBlocking { delay(100000) }

}

data class MyItem7(val id: Int) {
    init {
        print("MyItem init $id")
    }
}
출력이 너무 길어 첨부하지 못했다.
이 프로그램의 결과를 보면 한번에 1000개의 객체가 만들어지는것이 아닌 128개의 객체가 만들어지고 값이 출력된다.
즉 어느정도 값을 쌓아놓고 배출을 하게된다.
이렇게 배출을 반복하다보니 모든 배출량을 처리할 수 있다.
이제 stratege.ERROR를 시도해보자
fun main(args : Array<String>){
    val source = Observable.range(1,1000)
    source.toFlowable(BackpressureStrategy.ERROR)
        .map { MyItem8(it) }
        .observeOn(Schedulers.io())
        .subscribe{
            println(it)
            runBlocking { delay(600) }
        }
    runBlocking { delay(700000) }
}
data class MyItem8(val id : Int){
    init {
        println("MyItem Created $id")
    }
}
이전에 설명한대로 다운스트림이 업스트림을 따라갈 수 없기 때문에 오류가 발생되었다.
fun main(args : Array<String>){
    val source = Observable.range(1,1000)
    source.toFlowable(BackpressureStrategy.DROP)
        .map { MyItem9(it) }
        .observeOn(Schedulers.io())
        .subscribe{
            println(it)
            runBlocking { delay(100) }
        }
    runBlocking { delay(700000) }
}
data class MyItem9(val id : Int){
    init {
        println("MyItem Created $id")
    }
}
플로어블이 128개 이후에 출력되지않았다. 즉 나머지 값들을 다 버렸다.
BackpressureStrategy.MISSING과 onBackpressureXXX()
backpress 전략을 구현하지 않으므로 플로어블에게 어떤 전략을 따를지 명시적으로 알려줄 필요가 있음을 의미한다.
연산자에는 총 세 가지 주요 유형이 있다.
- onBackpressureBuffer()
- onBackpressureDrop()
- onBackpressureLatest()
onBackpressureBuffer()연산자
이 연산자는 BackpressureStrategy.BUFFER의 용도로 사용된다. 버퍼 크기, 크기 제한 여부와 같은 추가 구성을 얻을 수 있다.
fun main(args : Array<String>){
    val source = Observable.range(1,1000)
    source.toFlowable(BackpressureStrategy.MISSING)
        .onBackpressureBuffer()
        .map { MyItem11(it) }
        .observeOn(Schedulers.io())
        .subscribe{
            println(it)
            runBlocking { delay(1000) }
        }
    runBlocking { delay(700000) }
}
data class MyItem11(val id : Int){
    init {
        println("MyItem Created $id")
    }
}
매개변수를 지정하지않으면 기본적으로 128개의 버퍼를 가지지만
버퍼를 설정할 수도 있다.
fun main(args : Array<String>){
    val source = Observable.range(1,1000)
    source.toFlowable(BackpressureStrategy.MISSING)
        .onBackpressureBuffer(20)
        .map { MyItem12(it) }
        .observeOn(Schedulers.io())
        .subscribe{
            println(it)
            runBlocking { delay(1000) }
        }
    runBlocking { delay(700000) }
}
data class MyItem12(val id : Int){
    init {
        println("MyItem Created $id")
    }
}
이 예제는 버퍼의 개수를 20개로 지정하였다. 하지만 버퍼의 개수가 너무 작기때문에 예외가 발생한다.

onBackpressureDrop() 연산자
BackpressureStrategy.DROP과 일치하다.
fun main(args : Array<String>){
    val source = Observable.range(1,1000)
    source.toFlowable(BackpressureStrategy.MISSING)
        .onBackpressureDrop()
        .map { MyItem13(it) }
        .observeOn(Schedulers.io())
        .subscribe{
            print("Rec $it;\t")
            runBlocking { delay(1000) }
        }
    runBlocking { delay(700000) }
}
data class MyItem13(val id : Int){
    init {
        println("MyItem init $id;\t")
    }
}
onBackpressureLatest() 연산자
BackpressureStrategy.LATEST와 일치한다.
fun main(args : Array<String>){
    val source = Observable.range(1,1000)
    source.toFlowable(BackpressureStrategy.MISSING)
        .onBackpressureLatest()
        .map { MyItem13(it) }
        .observeOn(Schedulers.io())
        .subscribe{
            print("-> $it;\t")
            runBlocking { delay(1000) }
        }
    runBlocking { delay(700000) }
}
원천에서 백프레셔를 지원하는 플로어블 생성
다운스트림에서 백프레셔를 처리하는 표준 라이브러리를 사용하는 방법을 채웠다.
더 좋은 방법은 처음부터 백프레셔를 지원하는 것이다.
Flowable.generate()는 동일한 용도로 사용되고 있다.
다음 코드를 살펴보자
fun main(args : Array<String>){
    val flowable = Flowable.generate<Int>{
        it.onNext(GenerateFlowableItem.item)
    }
    flowable
        .map { MyItemFlowable(it) }
        .observeOn(Schedulers.io())
        .subscribe{
            runBlocking { delay(100) }
            println("Next $it")
        }
    runBlocking { delay(700000) }
}

data class MyItemFlowable(val id : Int){
    init {
        println("MyItemFlowable Created $id")
    }
}
object GenerateFlowableItem{
    var item:Int = 0
    get(){
        field +=1
        return field
    }
}
위 코드는 flowable.generate다. 호출할때마다 값이 증가하는 object GenerateFlowableItem을 사용하며 람다 안에서 onNext를 여러번 호출할 수 없다.
ConnectableFlowable
지금까지 4장에서는 콜드 옵저버블을 다뤘다. 핫 옵저버블을 다루고싶다면 ConnectableFlowable을 사용하면 된다.
구독 시점에 아이템 배출을 시작하지 않고 connect() 메서드가 호출될 때 시작한다.
아이템 배출하기 전에 의도한 모든 구독자가 Flowable.subscribe()를 기다리도록 할 수 있다.
fun main(args : Array<String>){
    val connectableFlowable = listOf("String 1", "String 2","String 3","String 4").toFlowable().publish()
    connectableFlowable.
            subscribe({
                println("Subscription 1: $it")
                runBlocking { delay(1000) }
                println("Subscription 1 delay")
            })
    connectableFlowable
        .subscribe({println("Subscription 2 $it")})
    connectableFlowable.connect()
}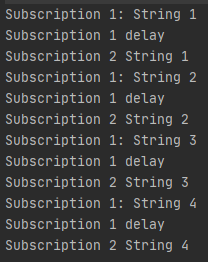
delay가 존재하더라도 순차적으로 진행된다.
프로세서
프로세서는 플로어블의 Subjects에 해당한다 모든 Subjects 유형은 백프레셔를 지원하는 프로세서 타입이 있다.
다음은 PublishProcessor의 사용 예제이다.
fun main(args : Array<String>){
    val flowable = listOf("String 1","String 2","String 3","String 4","String 5").toFlowable()

    val processor = PublishProcessor.create<String>()

    processor.
            subscribe({
                println("Subscription 1: $it")
                runBlocking { delay(1000) }
                println("Subscription 1 delay")
            })
    processor.subscribe({println("Subscription 2 $it")})
    flowable.subscribe(processor)
}
프로세서는 구독자가 모두 완료될 때까지 다음 푸시를 대기하고 있다.
버퍼, 스로틀링, 윈도우 연산자
Observable.interval/Flowable.interval을 사용하면 원천의 배출 속도를 느리게 할 수 없다. 정지 간격은 아이템을 동시에 처리할 수 있게 해주는 일부 연산자가 될 수 있다.
도움이 되는 연산자가 세 가지 있다.
- buffer
- throttle
- window
buffer() 연산자
buffer() 연산자는 배출을 모아서 리스트나 다른 컬렉션 유형으로 전달된다.
fun main(args: Array<String>) {
    val flowable = Flowable.range(1, 111)
    flowable.buffer(10)
        .subscribe { println(it) }
}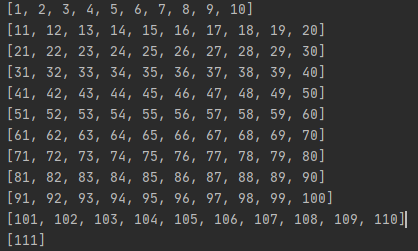
버퍼 연산자로 10을 버퍼 크기로 사용했으므로 Flowable에서 10개의 아이템을 모아서 리스트로 전달한다.
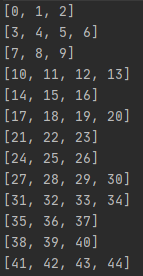
버퍼 연산자에는 skip 변수와 같은 쓸만한 설정이 하나 있다.
두번째 매개 변수에 정수로 건너뛰는 값을 지정해서 사용하는데 이는 정말 흥미로운 방식으로 작동한다.
fun main(args : Array<String>){
    val flowable = Flowable.range(1,111)
    flowable.buffer(10,15)
        .subscribe{println("Subscription 1 $it")}
    flowable.buffer(15,7)
        .subscribe { println("Subscription 2 $it") }
}
만약 buffer값보다 skip값보다 작으면 다음과 같이 동작한다.

시간 기반으로 버퍼링 할 수 잇도록 도와준다. 간단히 말하면, 원천으로부터 아이템을 모아서 일정 시간 간격으로 배출할 수 있다.
fun main(args : Array<String>){
    val flowable = Flowable.interval(100,TimeUnit.MILLISECONDS)
    flowable.buffer(1,TimeUnit.SECONDS)
        .subscribe{println(it)}
    runBlocking { delay(5000) }
}
버퍼 연산자의 또 다른 흥미로운 특징은 다른 생산자를 경계로 취할 수 있다는 것이다.
버퍼 연산자는 인접해 있는 생산자의 사이에서 모든 배출물을 모으고 각 생산자의 리스트로 배출한다.
fun main(args : Array<String>){
    val boundaryFlowable = Flowable.interval(350,TimeUnit.MILLISECONDS)
    val flowable = Flowable.interval(100,TimeUnit.MILLISECONDS)
    flowable.buffer(boundaryFlowable)
        .subscribe{println(it)}
    runBlocking { delay(5000) }
}
window() 연산자
window() 연산자는 아이템을 컬렉션 형태로 버퍼링하는 대신 프로듀서 형태로 버퍼링한다는 점만 빼면 거의 유사하다.
fun main(args: Array<String>) {
    val flowable = Flowable.range(1, 111)
    flowable.window(10)
        .subscribe { flo ->
            flo.subscribe {
                print("$it, ")
            }
            println()
        }
}
throttle() 연산자
buffer()와 window() 연산자는 배출을 수집한다. 스로틀 연산자는 배출을 생략한다.
fun main(args: Array<String>) {
    val flowable = Flowable.interval(100, TimeUnit.MILLISECONDS)
    flowable.throttleFirst(200, TimeUnit.MILLISECONDS)
        .subscribe { println(it) }
    runBlocking { delay(1000) }
}
'Study > RxKotlin' 카테고리의 다른 글
| [RxKotlin] 함수형 프로그래밍과 리액티브 프로그래밍 (0) | 2021.10.18 |
|---|---|
| [RxKotlin] 핫, 콜드 옵저버블과 Subjects (0) | 2021.10.16 |
| [RxKotlin] 옵저버블과 옵저버와 구독자 (0) | 2021.10.16 |
| [RxKotlin] Coroutine과 모나드 (0) | 2021.10.11 |
| [RxKotlin] 함수형 프로그래밍과 코틀린의 특징 (0) | 2021.10.09 |